

I've lately been feeling my way around getting an actual, production-ready ASP.NET Core app developed, and one of the features I've really been digging (one of many) is native support for Dependency Injection (DI). DI is huge in modern web apps, so making it the default for ASP.NET Core applications is, IMO, a big step forward for this framework.
But, at the moment, the documentation page for ASP.NET Core dependency injection has an example that just didn't click with me, and I believe that's because they didn't have any code examples to provide. In this post, I will provide two examples: one of my own design, and one which recreates an example provided in the official documentation; both of these sample projects are now over on GitHub. Let's learn how to use Dependency Injection in ASP.NET Core!
What Is Dependency Injection?
First, a few basics. The idea of Dependency Injection is that, when a class is created, it should have its dependent classes injected into it rather than created by it. This provides a situation in which we have loose coupling and high cohesion, an ideal which many software programs strive toward.
The ASP.NET Core documents explains it like this:
"[When using DI, ]Rather than directly instantiating collaborators, or using static references, the objects a class needs in order to perform its actions are provided to the class in some fashion. Most often, classes will declare their dependencies via their constructor, allowing them to follow the Explicit Dependencies Principle. This approach is known as 'constructor injection'."
Constructor injection is by far the most common approach to implementing DI, though not the only one. ASP.NET Core uses constructor injection in its solution, so (obviously) we will also do so.
Finally, note that there are many DI frameworks out there in addition to the native ASP.NET Core one, including StructureMap, Autofac, Ninject, SimpleInjector, and several others. StructureMap is my personal favorite, but all of these frameworks do roughly the same thing. Try a few to figure out which fits your style; in this demo I will use the native ASP.NET Core DI container.
A Basic DI Example
To demonstrate how Dependency Injection works in an ASP.NET Core app, let's set up a basic MVC app as a demo.
Pretend we need to model a list of users for our application. The class which represents these users might look like this:
public class User
{
    public string FirstName { get; set; }
    public string LastName { get; set; }
    public DateTime DateOfBirth { get; set; }
    public string Username { get; set; }
}
We will also need an interface and repository for retrieving the users. The interface and class will look like this:
public interface IUserRepository
{
    List<User> GetAll();
}

public class UserRepository : IUserRepository
{
    public List<User> GetAll()
    {
        return new List<User>()
        {
            new User()
            {
                FirstName = "Ash",
                LastName = "Ketchum",
                DateOfBirth = new DateTime(1997, 12, 30),
                Username = "ichooseyou"
            },
            new User()
            {
                FirstName = "Brock",
                LastName = "Harrison",
                DateOfBirth = new DateTime(1992, 3,31),
                Username = "rockrulez"
            },
            new User()
            {
                FirstName = "Misty",
                LastName = "",
                DateOfBirth = new DateTime(1999, 5,4),
                Username = "ihearttogepi"
            }
        };
    }
}
The reason we need an interface here is because our MVC controllers will reference the interface, not the class. Speaking of the controller, let's define one now:
public class HomeController : Controller
{
    private readonly IUserRepository _userRepo;

    public HomeController(IUserRepository userRepo)
    {
        _userRepo = userRepo;
    }

    [HttpGet]
    public IActionResult Index()
    {
        return View(_userRepo.GetAll());
    }
}
Notice the setup here. We have a private readonly instance of our interface IUserRepository, and the constructor takes an instance of IUserRepository and sets our private instance to the passed-in instance. This is constructor injection at its simplest.
But we're not done yet. As I've discussed previously on this blog, ASP.NET Core projects have a Startup.cs file, which configures the environment in which our app will run. The Startup.cs file also places services into ASP.NET Core's Services layer, which is what enables dependency injection.
Here's how we must modify our Startup.cs file to inject IUserRepository into our controller:
public void ConfigureServices(IServiceCollection services)
{
    // Add framework services.
    services.AddMvc();

    //Basic demo
    services.AddTransient<IUserRepository, UserRepository>();
}
We'll discuss what AddTransient<>() means in the next section. For now, let's run the app.
Here's what our page looks like when we get there:
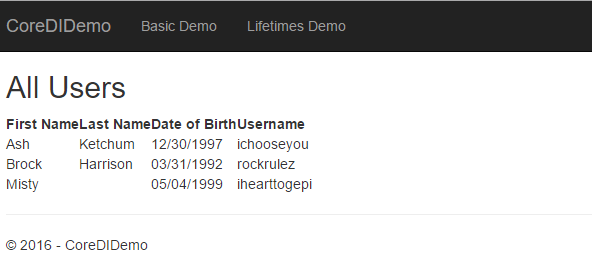
Note that once we added the IUserRepository to the Services layer, ASP.NET Core automatically injected it into our HomeController class. That's pretty neat!
But, what exactly does AddTransient<>() do in the Startup file? To discuss that, we must first discuss what ASP.NET Core uses as lifetimes for its services.
Dependency Injection Lifetimes
In ASP.NET Core's DI implementation, we see the concept of "lifetimes". A lifetime specifies when a DI-injected object gets created or recreated. There are three possibilities:
- Transient: Created each time they are requested.
- Scoped: Created once per request.
- Singleton: Created the first time they are requested. Each subsequent request uses the instance that was created the first time.
The ASP.NET Core official documentation provides a walkthrough of sorts for how these lifetimes behave, but I'm not satisfied with that example as it skips over a few sections of code that I think are rather important and doesn't provide a working example. I've reproduced it here, with a full working codebase which, like the earlier example, is over on GitHub.
To demonstrate how these lifetimes work, let's define a few interfaces. We'll need an interface IOperation which represents an operation being done in each of these lifetimes. Said operation will do one thing: it will return either Guid.NewGuid() or the passed-in Guid value from its one method. We'll also define four additional interfaces, each of which represents that operation during a specific lifetime:
public interface IOperation
{
    Guid GetCurrentID();
}

public interface IOperationTransient : IOperation { }

public interface IOperationScoped : IOperation { }

public interface IOperationSingleton : IOperation { }

public interface IOperationSingletonInstance : IOperation { }
IOperationSingletonInstance is a special form of this operation which will always return a blank Guid.
Now we can define the Operation class itself, which implements the four lifetime interfaces and defines the GetCurrentID() method.
public class Operation : IOperationTransient, IOperationScoped, IOperationSingleton, IOperationSingletonInstance
{
    public Guid Guid { get; set; }

    public Operation()
    {
        Guid = Guid.NewGuid();
    }

    public Operation(Guid guid)
    {
        Guid = guid;
    }

    public Guid GetCurrentID()
    {
        return Guid;
    }
}
Our Operation class will either return Guid.NewGuid() or used the Guid passed in to the constructor (this scenario is for the IOperationSingletonInstance interface demo).
However, to fully show how Transient operations work, we also need to define another class which represents a separate set of instances of these interfaces (separate from the ones being injected into our controller). We'll call this class OperationServices and it looks like this:
public class OperationService
{
    public IOperationTransient TransientOperation { get; }
    public IOperationScoped ScopedOperation { get; }
    public IOperationSingleton SingletonOperation { get; }
    public IOperationSingletonInstance SingletonInstanceOperation { get; }

    public OperationService(IOperationTransient transientOperation,
        IOperationScoped scopedOperation,
        IOperationSingleton singletonOperation,
        IOperationSingletonInstance instanceOperation)
    {
        TransientOperation = transientOperation;
        ScopedOperation = scopedOperation;
        SingletonOperation = singletonOperation;
        SingletonInstanceOperation = instanceOperation;
    }
}
Now we need to register the four lifetime interfaces and our OperationServices class into our Dependency Injection container. We do so in the Startup class's ConfigureServices() method, just like we registered the IUserRepository class earlier.
public void ConfigureServices(IServiceCollection services)
{
    // Add framework services.
    services.AddMvc();

    //Basic demo
    services.AddTransient<IUserRepository, UserRepository>();

    //Lifetimes demo
    services.AddTransient<IOperationTransient, Operation>();
    services.AddScoped<IOperationScoped, Operation>();
    services.AddSingleton<IOperationSingleton, Operation>();
    services.AddSingleton<IOperationSingletonInstance>(new Operation(Guid.Empty));
    services.AddTransient<OperationService, OperationService>();
}
With all our dependencies registered, we can now create an OperationsController which will demo how these lifetimes work.
public class OperationsController : Controller
{
    private readonly OperationService _operationService;
    private readonly IOperationTransient _transientOperation;
    private readonly IOperationScoped _scopedOperation;
    private readonly IOperationSingleton _singletonOperation;
    private readonly IOperationSingletonInstance _singletonInstanceOperation;

    public OperationsController(OperationService operationService,
        IOperationTransient transientOperation,
        IOperationScoped scopedOperation,
        IOperationSingleton singletonOperation,
        IOperationSingletonInstance singletonInstanceOperation)
    {
        _operationService = operationService;
        _transientOperation = transientOperation;
        _scopedOperation = scopedOperation;
        _singletonOperation = singletonOperation;
        _singletonInstanceOperation = singletonInstanceOperation;
    }

    public IActionResult Index()
    {
        // viewbag contains controller-requested services
        ViewBag.Transient = _transientOperation;
        ViewBag.Scoped = _scopedOperation;
        ViewBag.Singleton = _singletonOperation;
        ViewBag.SingletonInstance = _singletonInstanceOperation;

        // operation service has its own requested services
        ViewBag.Service = _operationService;
        return View();
    }
}
For posterity, I will also include the .cshtml file which displays the results of that Index() action:
@{
    ViewData["Title"] = "ASP.NET Core Dependency Injection Demo";
}

<h2>Lifetimes</h2>

<span>Controller Operations</span>
<ul>
    <li><strong>Transient:</strong> @ViewBag.Transient.GetCurrentID()</li>
    <li><strong>Scoped:</strong> @ViewBag.Scoped.GetCurrentID()</li>
    <li><strong>Singleton:</strong> @ViewBag.Singleton.GetCurrentID()</li>
    <li><strong>Singleton Instance:</strong> @ViewBag.SingletonInstance.GetCurrentID()</li>
</ul>
<span>OperationService Operations</span>
<ul>
    <li><strong>Transient:</strong> @ViewBag.Service.TransientOperation.GetCurrentID()</li>
    <li><strong>Scoped:</strong> @ViewBag.Service.ScopedOperation.GetCurrentID()</li>
    <li><strong>Singleton:</strong> @ViewBag.Service.SingletonOperation.GetCurrentID()</li>
    <li><strong>Singleton Instance:</strong> @ViewBag.Service.SingletonInstanceOperation.GetCurrentID()</li>
</ul>
Testing the Lifetimes
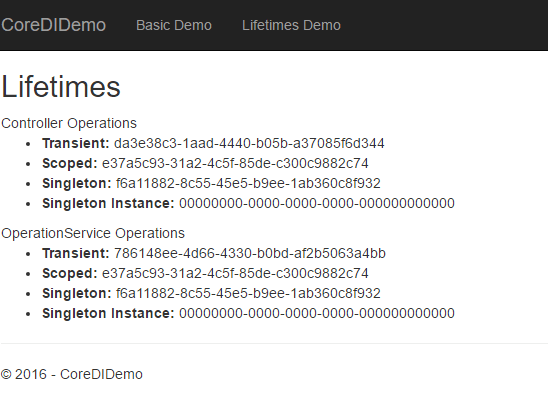
With all of our code in place, we are now ready to test. Let's look at two screenshots of that demo page. The first screenshot is when we first load the page.
The second screenshot is of the same page after doing a refresh:
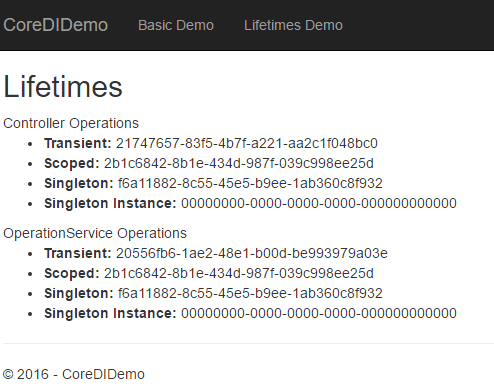
We need to notice a few things about the differences in these screenshots:
- Each time it shows up, the Transient Guid is different.
- The Scoped Guids are the same for both calls in a single screenshot, but not in each screenshot.
- The Singleton Guids are the same all four times they are called.
- The Singleton Instance Guids (as expected) are always 0s.
I personally find that the differences are easier to spot if I see them in real-time, so I made this gif:
Summary
One of the best new features coming from ASP.NET Core is the inclusion of its own lightweight Dependency Injection container. In this post, we've seen how to use ASP.NET Core Dependency Injection to inject a simple service into a controller, and we've seen the three DI lifetimes (Transient, Scoped, Singleton) and how they behave differently from one another.
As always, please feel free to check out the code base for this post over on GitHub and let me know if you see any improvements I could make.
Happy Coding!