

Hexo Framework is a simple static site generator, mainly intended to be used for generating blogs. This is the first part of the Creating a Hexo blog post series. In the first post, we will go through a short overview of static site generators, and we will install the Hexo framework and the theme of our choice. The second post of this series will describe some useful blog customizations, while in the third post we will explain how to use our Hexo generated blog for writing posts. The last part will explain one possible way of deploying our blog and an easy way to host our blog on a GitHub Pages server, directly from the GitHub repository.
A finished blog that we are building in this series is available online, served on a GitHub Pages server. The source code can be seen on this GitHub repository.
Overview
There are numerous articles, videos, and tutorials on this subject - creating a Hexo blog. Most of them explain using Hexo in just running several simple bash commands one after the other. And that is all that's needed - using Hexo Framework is that simple. Because of this simple Hexo usage, we don't need to worry about all the details happening in the background of this generating process.
Anyway, the main intention of this post series is to cover step by step process of creating a blog with the Hexo framework. We'll try to explain what each of Hexo commands is doing so that anyone can understand all the actions that are happening in the background when we create a static website with Hexo. The goal here is that for a reader who is new to Hexo, by following instructions, in the end, should understand its blog structure, and have a fully working Hexo blog hosted with the GitHub Pages directly from GitHub repository. Let's start.
Static site generators
Static websites are popular because they are super-efficient, extremely fast and usually free to host. Blogs, resumes, marketing websites, landing pages, and documentation are all good candidates for static websites.
The previous sentence is a citation taken from this interactive presentation-style tutorial website, where you can see a nice animation that visually presents the differences between static and dynamic websites.
In short, static site generators are used to generate static HTML files that will be served by the web server. With static content, there is no backend service processing, no accessing a database, no private data. Since this kind of website is stateless in nature, it can be scaled to many servers with ease. That's why the whole process is very secure, page loading is very fast and static content is easy for caching. This way we get the fastest website serving that is possible.
NOTE: I am working on Windows OS, and all commands will be executed in Git Bash for Windows. It should be analog in case you are working on different OS.
Installing Hexo
Hexo is only one of many open-source static site generators out there. It is mostly used as a blogging framework, but it can also be used for other purposes. Often, Hexo is used for maintaining project documentation. It is built with Node.js, and has a deploy integration for the GitHub. So, for installing Hexo, we need to have Node (which includes npm) and Git installed.
Assuming we have installed Node and Git, we can install Hexo Framework ('hexo-cli' - Hexo Command Line Interface) by running following line in a command terminal:
npm install -g hexo-cli
Wait for the installation process to finish, and if everything went well, we can confirm Hexo is installed properly by asking about Hexo version info:
hexo --version
We should get a list of version informations displayed.
Now, lets create a new folder where our blog files will reside. We will set this folder to be a GitHub repository later.
In a command prompt, go to this newly created blog folder, and to initialize an empty blog, type the following command:
hexo init
All of the Hexo commands that we will be explaining need to be executed from this same folder (our blog root folder).
When running hexo init command, the Hexo framework downloads all the files and folders needed for an initial blog structure.
Actually, Hexo is downloading the content of the hexo-starter repository.
It also downloads the default theme, that comes with the initial Hexo blog (landscape theme).
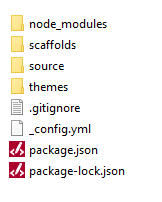
After it's done, we should see the following files and folders in our blog folder:
Serving Hexo Blog
At this moment we already have an empty blog created. To see this newly generated blog, run Hexo command for serving blog locally:
hexo server
Check how our blog looks like by going to localhost:4000 address in our browser. By default, the Hexo blog comes with the theme called landscape.
The theme defines the look and feel of our site. We can have more than one theme installed, but we need to set which theme is active in the _config.yml file, that is in the root(blog) folder. Every theme we have installed is placed in a separate folder, underneath the 'themes' folder.
NOTE: To make it clear, there are two _config.yml files:
- _config.yml under the root(blog) folder -> contains blog-level configurations, and
- _config.yml under the 'themes/name_of_the_theme' folder -> contains additional, theme related configurations
Hexo has a great community and there are many different Hexo themes that we can check and try on Hexo themes site. In our posts, we will be installing and configuring clean-blog theme. I have chosen this theme because it is simple to use, but still contains the main features needed for a typical blog.
Installing a new theme
If our local server is still running, press 'CTRL+C' in command prompt for stopping it. We are going to install clean-blog theme, and delete default landscape theme. If we open 'themes' folder in Windows Explorer, we will see landscape folder as the only folder there. For installing clean-blog theme, enter:
git clone https://github.com/klugjo/hexo-theme-clean-blog.git themes/clean-blog
After theme installation is done, besides the 'landscape' folder, there should also be a 'clean-blog' folder present inside the 'themes' folder. Delete the 'landscape' folder(theme).
By running the previous command, we have cloned a new repository from the GitHub. This means, that there is '.git' hidden folder inside the 'clean-blog' folder. To be able to see this folder in our file explorer, make sure you have an option for hidden items set to be visible. Since we are going to have '.git' folder in the root of our blog folder structure, and we will not be contributing to clean-blog theme development, delete the '.git' folder that is inside the 'clean-blog' folder.
At this moment, we have deleted the default theme, installed a new theme, but we still need one more step to activate the newly installed theme. In editor of your choice (Visual Studio Code, Atom, Sublime ...) open our blog folder, then open _config.yml that is under our root(blog) folder.
Find the line for 'theme' setting, and set the 'theme' to:
theme: clean-blog
Again, start Hexo server locally (hexo server), and check how our site looks now, with the new theme applied: localhost:4000.
It is a good time to put the content we currently have under source control. I will assume you are familiar with initializing a new local and remote git repositories, connecting them and making commits. There is a step by step process of adding a local repository to GitHub described on the official GitHub Help page.
Make sure our new repository is public (not private). The reason why it has to be public is because GitHub Pages will be serving our blog content from it.
NOTE: I'll be making git commits after every reasonable change we make in our blog creation process. This way we'll be able to review our step by step changes in the commit history of the repository.
Summary
To sum up, these are the steps we went through in this part:
- installed required software: Node and Git
- installed Hexo Framework
- generated initial Hexo blog
- served our Hexo blog locally
- installed and activated (clean-blog) theme
In the second part of this post series, we will be installing some useful Hexo plugins, applying blog and theme-level configurations, we will add personal informations to our blog and in the end we should have a fully configured blog that is ready for use.