

For the final post in this series about drawing with FabricJS and TypeScript, let's figure out a way to save our created drawing to the server with an AJAX call.
The Sample Project
For the final time, don't forget to check out the sample project for this series over on GitHub. It really is quite useful.

The Final DrawingEditor Modifications
Our save function will need to exist on the Razor Page code-behind file. Because of this, we require a way for our main DrawingEditor class to use that function as a callback. We also need to be able to create the JSON for the current drawing, and lucky for us, FabricJS provides a way to do exactly that:
class DrawingEditor {
    //...Properties and Constructor

    //...Other methods

    setSaveFunc(saveFunction: Function) {
        this.saveFunc = saveFunction;
    }

    save() {
        this.saveFunc();
    }

    getJson(): string {
        //This method serializes the canvas content to JSON
        const outP = this.canvas.toJSON();
        return outP;
    }
}
The Final Markup Modifications
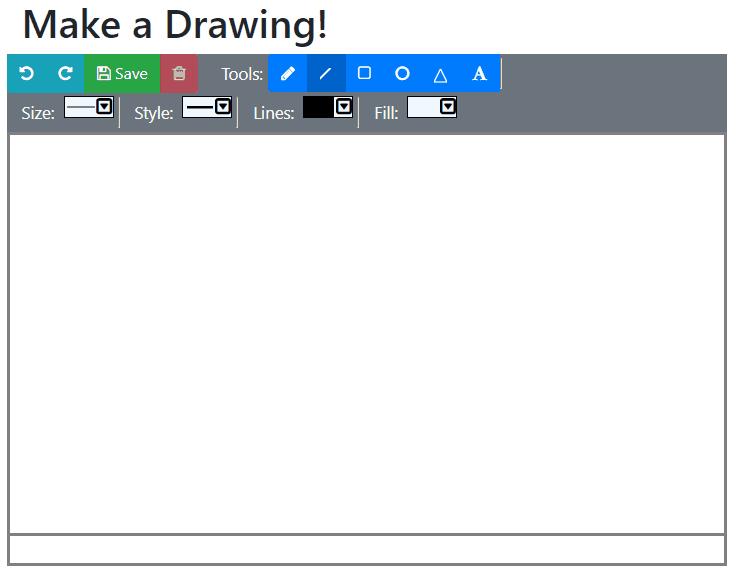
The rest of our changes will take place on our Drawing.cshtml Razor Page. First, we need to add a save button to the markup:
<div class="row drawingToolbar bg-secondary text-light">
    <div class="btn-toolbar">
        <div class="btn-group mr-2" role="group">
            <div id="undoComponent"></div>
            <div id="redoComponent"></div>
            <button onclick="saveDrawing(event); return false;" title="Save" class="btn btn-success">
                <i class="fa fa-save d-inline"></i>
                <span>Save</span>
            </button>
            <div id="deleteComponent"></div>
        </div>
    </div>
    <!--Other components -->
</div>
Note the saveDrawing() function; this is not implemented quite yet. The next thing we need is to make the page handler that will "process" the POSTed drawing JSON. Since we're not actually doing anything with the JSON, the code is very short:
public class DrawingModel : PageModel
{
    [BindProperty]
    public string DrawingContent { get; set; }

    public void OnGet() { }

    public void OnPostSave()
    {
        var drawingJson = DrawingContent;
    }
}
In normal circumstances, we'd almost certainly want the OnPostSave() method to return something, be it IActionResult, JsonResult, or just a string.
The Final Script
Now we need to return to the Razor Page and implement the saveDrawing() function to call the new OnPostSave() method. We also need to show and hide the "saving" status message on the status bar immediately below the canvas.
One additional thing Chris decided to do was put some extra code in to prevent "double-click" saving, so our save method can only be called one second after it was last called. You can see all of this code below:
$(function () {
    //...Initialize canvas

    //Set the DrawingEditor's saveFunc
    editor.saveFunc = saveDrawing();
});

function saveDrawing() {
    //If we can save...
    if (!savingLocked) {
        //Show the save message
        showSaving();

        //Create the AJAX content
        const drawing = {
            DrawingContent: JSON.stringify(editor.getJson()),
        };

        //POST the content to the server
        $.ajax({
            type: "POST",
            data: drawing,
            async: true,
            url: '?handler=Save'
        }).done(function (data) {
            //When this is done, hide the saving message
            hideSaving();
        }).fail(function () {
            //If this fails, hide the saving message
            //and show an alert
            hideSaving();
            alert('We are unable to save changes at this time.');
        });
    }
}

function showSaving() {
    message = savingMessage;
    $('#StatusBar').html(message);
    savingLocked = true; //Cannot save again for one second
    setTimeout(function () { savingLocked = false; }, 1000);
}

function hideSaving() {
    if (savingLocked)
        //Cannot hide the saving message again for 100 milliseconds
        setTimeout(() => hideSaving(), 100);
    else {
        $('#Saving').remove();
        message = '';
    }
}
With all of this in place, we now have a working save feature!
The Last Hotkey
There's one last little thing we should do: since we already have hotkeys for cut, copy, paste, etc. we should implement the hotkey for save (Ctrl+S) as well. Here's the modifications we need to make to DrawingEditor to realize this:
class DrawingEditor {
    //...Properties

    private keyCodes = {
        'C': 67,
        'S': 83, //New key code
        'V': 86,
        'X': 88,
        'Y': 89,
        'Z': 90
    }

    //...Constructor and other methods

    //Initializes hotkey events
    private initializeKeyCodeEvents() {
        window.addEventListener('keydown', (event: KeyboardEvent) => {
            //process Ctrl Commands
            if (event.ctrlKey) {
                switch (event.keyCode) {
                    case this.keyCodes['Z']:
                        this.undo();
                        break;
                    case this.keyCodes['Y']:
                        this.redo();
                        break;
                    case this.keyCodes['C']:
                        this.copier.copy();
                        break;
                    case this.keyCodes['X']:
                        this.copier.cut();
                        break;
                    case this.keyCodes['V']:
                        this.copier.paste();
                        break;
                    //New key code implementation
                    case this.keyCodes['S']:
                        this.saveFunc();
                        break;
                }

                event.preventDefault();
                event.stopPropagation();
                return false;
            }
        });
    };
}
GIF Time!
Let's see how this works in a GIF:
Pay special attention to the lower-right side of the GIF, where the "Saving" message will appear very briefly.
Conclusion
That's it! With this last feature, we have made our drawing canvas match the goal photo from the beginning of the series! Thank you, dear readers, for reading these posts about creating a drawing canvas with FabricJS and TypeScript! Chris and I are pretty proud of this sample, and we hope it helps you all in your projects.
For the final time, don't forget to check out the sample project for this series over on GitHub. It contains the final, working code for this series. Don't be afraid to make pull requests if you see a way we can improve!
Stay tuned for a special Guest Writer Program post on Thursday!
Happy Drawing!