
In our previous post, we demonstrated how to model the classic computer game Minesweeper as a C# program. In this post, we're going to take that model and use Blazor WebAssembly to create a working game. Plus I've got a very special announcement near the end of this post that you don't want to miss. Let's go!
The Sample Project
As with any post tagged "Sample Project", the code for this series can be found over on GitHub.
 exceptionnotfound
Also check out the other posts in my Modeling Practice series:
 Matthew Jones
The Initial Component
In Blazor, we do not have "pages"; rather we use Components (files that have the .razor suffix). To be fair, they look almost exactly like Razor Pages.
Here's a starting Component we can use for this post:
@page "/minesweeper"
@using BlazorGames.Models.Minesweeper
@using BlazorGames.Models.Minesweeper.Enums
@code {
GameBoard board = new GameBoard();
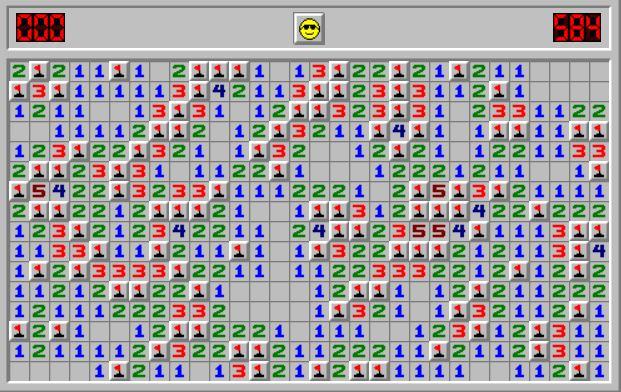
}Let's take a look at a Minesweeper board again:
See the border running around the game area and the header? We need to have a way to create that border. Since it is essentially an additional space on any given side of the board, we need extra space in our calculations. Keep that in mind.
For now, let's concentrate on the area of the board where the numbers and mines are. For the size of the board X by Y, we need X + 2 columns of Y + 2 height, where the extremes (uppermost, lowermost, leftmost, rightmost) rows and columns are the border. Therefore our markup might look like this:
<div class="minesweeper-board">
    @{
        var maxWidth = board.Width + 1;
        var maxHeight = board.Height + 1;
    }

    @for (int i = 0; i <= maxWidth; i++)
    {
        @for (int j = 0; j <= maxHeight; j++)
        {
            int x = i;
            int y = j;

            if (x == 0 && y == 0) //Upper-left corner
            {
                <div class="minesweeper-border-jointleft"></div>
            }
            else if (x == 0 && y == maxHeight) //Upper-right corner
            {
                <div class="minesweeper-border-jointright"></div>
            }
            else if (x == maxWidth && y == 0) //Lower-left corner
            {
                <div class="minesweeper-border-bottomleft"></div>
            }
            else if (x == maxWidth && y == maxHeight) //Lower-right corner
            {
                <div class="minesweeper-border-bottomright"></div>
            }
            else if (y == 0 || y == maxHeight) //Leftmost column
            {
                <div class="minesweeper-border-vertical"></div>
            }
            else if (x == 0 || x == maxWidth) //Rightmost column
            {
                <div class="minesweeper-border-horizontal"></div>
            }
            else if (y > 0 && y < maxHeight)
            {
                <!-- Output panels -->
            }
        }
    }
</div>
NOTE: The CSS classes in use here are originally from Minesweeper Online, were modified and renamed by me for use in this project, and can be viewed on GitHub.
We now need to consider how to output the panels themselves.
Displaying the Panels
In our implementation a Panel may, at any time, be in one of five potential states:
- Revealed Mine
- Revealed Number
- Revealed Blank
- Flagged
- Unrevealed
We need special CSS classes for each state, and so the finished markup for the page will need to include the following:
<div class="minesweeper-board">
    @{
        var maxWidth = board.Width + 1;
        var maxHeight = board.Height + 1;
    }

    @for (int i = 0; i <= maxWidth; i++)
    {
        @for (int j = 0; j <= maxHeight; j++)
        {
            int x = i;
            int y = j;

            if (x == 0 && y == 0) //Upper-left corner
            {
                <div class="minesweeper-border-jointleft"></div>
            }

            //...All the other IF clauses

            else if (y > 0 && y < maxHeight)
            {
                var currentPanel = board.Panels.First(m => m.X == x
                                                           && m.Y == y);
                if (currentPanel.IsRevealed)
                {
                    if (currentPanel.IsMine) //Mine
                    {
                        <div class="minesweeper-gamepiece minesweeper-mine"></div>
                    }
                    else if (currentPanel.AdjacentMines == 0) //Blank
                    {
                        <div class="minesweeper-gamepiece minesweeper-0"></div>
                    }
                    else //Number
                    {
                        <div class="minesweeper-gamepiece [email protected]">@currentPanel.AdjacentMines</div>
                    }
                }
                else if (currentPanel.IsFlagged)
                {
                    <div class="minesweeper-gamepiece minesweeper-flagged"></div>
                }
                else //Unrevealed
                {
                    <div class="minesweeper-gamepiece minesweeper-unrevealed"></div>
                }
            }
        }
    }
</div>
There's an additional wrinkle to consider: in some of these states, namely the Flagged and Unrevealed ones, the user can interact with the panel by left clicking (to reveal) or right-clicking (to flag). We need to implement that functionality.
Left-Click to Reveal
You may recall that we implemented a MakeMove() method in the C# model. The reason why was so that it could be called here. This is the markup for the unrevealed panel, now with an @onclick event:
<div class="minesweeper-gamepiece minesweeper-unrevealed"
     @onclick="@(() => board.MakeMove(x, y))"
     @oncontextmenu="@(() => board.FlagPanel(x, y))"
     @oncontextmenu:preventDefault>
</div>
There's a lot to dissect here:
- The @onclick directive is a Blazor directive that binds a C# method to an onclick event. In this case, we are calling MakeMove() and passing the coordinates of the clicked panel.
- The @oncontextmenu directive allows us to specify what should happen when the context menu (AKA the right-click menu) should be displayed. Since we want to flag panels on right-click, we say that here.
- The @oncontextmenu:preventDefault is a specialized instruction to Blazor that prevents the context menu from displaying on right-clicks.
Let's also see the markup for the flagged panel:
<div class="minesweeper-gamepiece minesweeper-flagged"
     @oncontextmenu="@(() => board.FlagPanel(x, y))"
     @oncontextmenu:preventDefault>
</div>Okay! We have our playing area ready. Now let's build the header where the mine counter, timer, and face are placed.
The Header
Here's the full markup for the header area:
<div class="minesweeper-board"
     @oncontextmenu:preventDefault
     onmousedown="faceOooh(event);" <!-- Explanation below -->
     onmouseup="faceSmile();">
    <div class="minesweeper-border-topleft"></div>
    @for (int i = 1; i < maxWidth; i++)
    {
        <div class="minesweeper-border-horizontal"></div>
    }
    <div class="minesweeper-border-topright"></div>
    <div class="minesweeper-border-vertical-long"></div>
    <div class="minesweeper-time-@GetPlace(board.MinesRemaining, 100)"
         id="mines_hundreds"></div>
    <div class="minesweeper-time-@GetPlace(board.MinesRemaining, 10)"
         id="mines_tens"></div>
    <div class="minesweeper-time-@GetPlace(board.MinesRemaining, 1)"
         id="mines_ones"></div>
    @if (board.Status == GameStatus.Failed)
    {
        <div class="minesweeper-face-dead"
             id="face"
             style="margin-left:70px; margin-right:70px;"
             @onclick="@(() => board.Reset())"></div>
    }
    else if (board.Status == GameStatus.Completed)
    {
        <div class="minesweeper-face-win"
             id="face"
             style="margin-left:70px; margin-right:70px;"
             @onclick="@(() => board.Reset())"></div>
    }
    else
    {
        <div class="minesweeper-face-smile"
             id="face"
             style="margin-left:70px; margin-right:70px;"
             @onclick="@(() => board.Reset())"></div>
    }
    <div class="minesweeper-time-@GetPlace(board.Stopwatch.Elapsed.Seconds,100)"
         id="seconds_hundreds"></div>
    <div class="minesweeper-time-@GetPlace(board.Stopwatch.Elapsed.Seconds,10)"
         id="seconds_tens"></div>
    <div class="minesweeper-time-@GetPlace(board.Stopwatch.Elapsed.Seconds,1)"
         id="seconds_ones"></div>
    <div class="minesweeper-border-vertical-long"></div>
</div>
Make 'Em Say "Oooh"
There are certain things that Blazor, in its current form, is just not good at. For example, in the desktop version of Minesweeper, whenever the user left-clicks a panel the smiley face turns to an "oooh" face. Blazor cannot do this (or, more accurately, I could not figure out how to do this in Blazor). So, I turned to good old JavaScript to get the face to say "oooh!".
function faceOooh(event) {
    if (event.button === 0) { //Left-click only
        document.getElementById("face").className = "minesweeper-face-oooh";
    }
}

function faceSmile() {
    var face = document.getElementById("face");

    if (face !== undefined)
        face.className = "minesweeper-face-smile";
}
What Time Is It Anyway?
Surprisingly, to me anyway, the timer proved to be the most difficult part of this entire implementation, and exactly why that is true requires some explaining.
Blazor has a special method, StateHasChanged(), which allows us developers to tell it that the state of its object has changed and it should refresh the display. But my timer, you might remember, was implemented on the backend as a C# Stopwatch class, and of course the C# code has no way to notify the Blazor frontend that something has changed (namely, that a second has gone by).
So, I had to fake it, and that required a couple parts. First I needed a JavaScript method to display a passed-in time:
function setTime(hundreds, tens, ones) {
    var hundredsElement = document.getElementById("seconds_hundreds");
    var tensElement = document.getElementById("seconds_tens");
    var onesElement = document.getElementById("seconds_ones");

    if (hundredsElement !== null) {
        hundredsElement.className = "minesweeper-time-" + hundreds;
    }
    if (tensElement !== null) {
        tensElement.className = "minesweeper-time-" + tens;
    }
    if (onesElement !== null) {
        onesElement.className = "minesweeper-time-" + ones;
    }
}
On the Blazor component itself, I needed to use the special method OnAfterRenderAsync, which fires after the control is rendered to the browser:
@inject IJSRuntime _jsRuntime
@inject NavigationManager _navManager

@code {
    protected override async Task OnAfterRenderAsync(bool firstRender)
    {
        while (board.Status == GameStatus.InProgress && _navManager.Uri.Contains("minesweeper"))
        {
            await Task.Delay(500);
            var elapsedTime = (int)board.Stopwatch.Elapsed.TotalSeconds;
            var hundreds = GetPlace(elapsedTime, 100);
            var tens = GetPlace(elapsedTime, 10);
            var ones = GetPlace(elapsedTime, 1);

            await _jsRuntime.InvokeAsync<string>("setTime", hundreds, tens, ones);
        }
    }
}
This solution is 100% a hack; every half-second it invokes a JS method to display the new time. To even be able to do this I had to inject two new dependencies to the component:
- IJSRuntime, which allows Blazor code to invoke JavaScript functions AND
- NavigationManager, which allows access to URIs used by the Blazor app.
Obviously this is not a perfect solution, but it works, which is good enough for now.
We're Done!
Guess what? We did it! We created a fully-functional Minesweeper clone in ASP.NET Core, C#, and Blazor. Pretty sweet huh?
But don't take my word for it: try it out yourself!
Introducing BlazorGames.net!
I got pretty tired of not having a sample site available for you, my dear readers, to check out, so I set one up specifically for Blazor WebAssembly projects! It's called BlazorGames.net, and you can check it out for yourself.

I intend for this site to become a learning site for all things Blazor, where we can learn how to build complex, real-world problems AND see the fruits of the labor in the same place. And it's all open source, and available on GitHub:
exceptionnotfoundThe Tic-Tac-Toe and ConnectFour examples I have written about previously are already live on this new site, and more are coming! I am constantly making improvements to the site, and I would love to hear your opinions on it!
Summary
It took some specialized markup and judicious use of the dreaded JavaScript, but we got a working game of Minesweeper working in Blazor WebAssembly. And the best part is, with the new site BlazorGames.net up and running, you no longer have to take my word for it!
Happy Coding!